Honeywell IPCAM-WOC1 Outdoor Security Camera Review

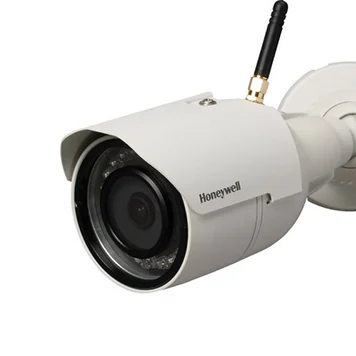
Honeywell has just informed us that their latest wireless outdoor security camera, the IPCAM-WOC1, will become available to customers in early February. Announced in the latter half of 2017, it will be the first of their Total Connect-compatible security cameras that’s designed for outdoor use.

The new camera features:

  • Compatibility with Honeywell Total Connect 2.0 and Lyricâ„¢ security and home control systems
  • Simple set-up with QR code installation and multiple mounting options
  • Expansive Cloud Video Storage or Local Storage
  • Enhanced Wi-Fi® connectivity and range with 802.11n
  • Wide angle views and sharper night vision with up to 1080p resolution

To figure out what distinguishes this device from the two previously-released indoor cameras (WIC1 and WIC2), let’s take a closer look at the specs.

Download our FREE Ultimate Guide to Home Security to get all the information you need about how alarm systems work, what system is right for your needs, and how to secure your home.

Switch Your Existing System

Image Sensor: Sony IMX323

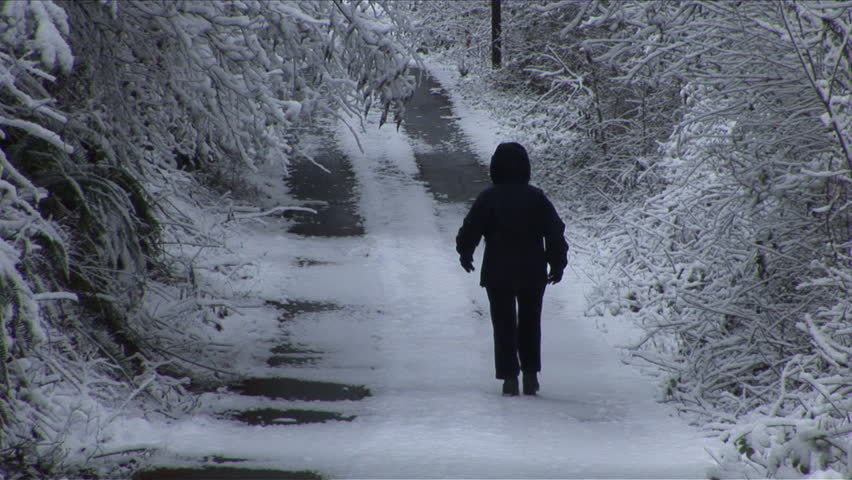
Sony released the IMX323 in 2016 and designed this sensor to be both compact and cost-effective, delivering 1080p video at a lower cost than its competitors. One of the strengths of the IMX323 is its effectiveness under low-light conditions, which shows in the WOC1’s ability to see up to 65 feet away in the dark. You can see the difference in these photos below.

sony imx323 image sensor

(Source)

Field of View: Diagonal View Angle 117°; Horizontal 113°

You might have noticed that diagonal view angle is lower than the WIC1 and WIC2, which have a 135° and 138° view angle, respectively.

In contrast, the WOC1 has a slightly larger horizontal field of view. So while the WOC1 might have a smaller field of vision overall, its horizontal field of view makes it better for what it’s designed to do: watch over driveways or pathways.

Digital Zoom: Up to 10X Digital Zoom

Zoom and enhance all of the details that the WOC1 is capable of picking up with its approximately 2.19M pixels! 10X zoom is significantly greater than any of its predecessors, making the WOC1 better at picking up things like facial features and license plates.

Motion Detection Zones: 4 active motion detection areas

Isaac Blog Post V2.png

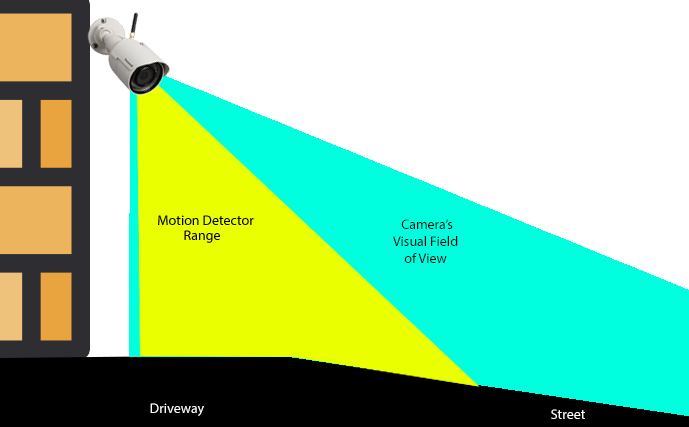
The WOC1 uses the same number of motion detection areas as the WIC2, but this time Honeywell is allowing users to change the sensitivity as needed.

For example, if you want to pick up people and animals on your front porch but not vehicles moving around in the street, you may want to lower the sensitivity and change the settings so that the motion detector only focuses on the zones closest to you.

Operating Temperature and Weatherproofing

The ultimate question: can this camera survive a New England winter? We reckon that with an operating temperature range of 14°F to 131°F, the WOC1 will be fine as long as you don’t try to install it somewhere in Vladivostok.

Something like the record-breaking low temperatures and heavy snow during the polar vortex of 2015 would probably not be good for the camera’s longevity, but we expect the camera to function even if the weather drops below or above Honeywell’s stated minimum and maximum operating temperatures.

As for weatherproofing, the camera is protected by an IP66-rated housing (meaning it can withstand torrential downpours and is totally protected from dust), but the wires that provide power to it are NOT weatherproof (thin wires rarely do well in events like snowstorms), so keep that in mind when setting it up.

Microphone and Audio

Unlike Honeywell’s indoor cameras, the WOC1 doesn’t have a microphone or any audio capabilities. Although some outdoor camera brands do add a microphone, installing such devices puts you at risk of recording people’s conversations without their consent, which is illegal.

Also, a microphone on an outdoor camera would primarily pick up the sounds of cars driving by, doors opening, and footsteps.

If for whatever reason you need your outdoor camera to pick up sound, you should look for an alternative solution.

We believe in providing our customers with the most up-to-date info on cutting-edge security technology so that they can make more informed decisions. Want to add a WOC1 camera to your Alarm New England-monitored system?

Customize your security system using our free tool in the link below and we’ll get you a quote within one business day.

customize your system »

How to Prevent Pipes from Freezing

When the weather turns frigid, you are at a high risk of pipes freezing and potentially bursting. Burst pipes are one of the most common causes of home damage in the winter months and the cost to repair both the pipes and potential water damage this can create is significant.

The good news is that you can prevent pipes from freezing by being diligent, taking protective measures and knowing the facts.

Which pipes are most vulnerable to freezing?

Some pipes in your home are more susceptible to freezing than other simply because of their location in your home. The pipes that are at the highest risk for freezing are:

  • Pipes that are exposed and located in unheated areas of the home (basement, garage, etc.
  • Pipes found in exterior walls
  • Any pipes located on the exterior of your home

Frozen Pipe Prevention

As soon as winter approaches and temps start to drop, you should be thinking about taking measures to keep your pipes out of the danger zone for freezing. Experts suggest that the threshold to keep in mind for freezing pipes is when the temperature reaches 20 degrees Fahrenheit or below.

Here are our top prevention tips to help you beat the cold and keep the water running:

  • Open the doors to your kitchen and bathroom cabinets to allow the pipes to be exposed to the warm air circulating in the room. When the cabinets remain closed, they have less of a chance of benefiting from the warm air in the rest of the room.
  • Open any faucets with exposed pipes to a slow drip of cold water. Keeping water running through the pipes will help prevent them from freezing.
  • Install a low-temperature sensor. When the temperature drops below a certain threshold, the low temperature sensor will notify you via your keypad, phone, email, or whatever method you have set up. Some sensors also produce an audible alarm. Install it anywhere in your home within minutes and always be in the know if your home becomes dangerously cold.
  • Keep your house warm. Many people turn down their thermostats when they are sleeping or away, but it is not wise to do so in extremely cold weather. In fact, if you plan to leave your home during cold weather months, be sure your thermostat is set no lower than 55 degrees.
  • The ultimate step in frozen pipe prevention is to add in insulation to the areas where pipes are prone to freezing. Ideally, this should be done before the cold weather season so you have time to ensure all the exposed pipes are covered.

What to Do in the Case of a Frozen Pipe

If, despite your best efforts, you end up with a frozen pipe, there are several steps that you can take to thaw it.

Frozen pipes need to be handled with caution, they are at a high risk for bursting and flooding your home with water. If you discover that a pipe has already broken or burst, immediately turn off the main water supply to prevent further flooding and damages.

If you have a frozen pipe, but no burst, you can do the following to alleviate the situation:

  • Run water through the frozen pipe. There is usually an ice plug somewhere inside the pipe and as it starts to melt, running water through the pipe assist in the melting and break up of the ice plug.
  • Apply heat to the affected pipe. There are many things you can use to apply heat to the pipe such as; a blow dryer, space heater, heating pad or there are even specialized heating tools designed for frozen pipes that you can purchase. DO NOT use any kind of heating tool that has an open flame as this is a serious fire hazard and could also melt your pipes.

Continue to run the water and apply heat to the pipe until you see that full water pressure has been restored in all of your faucets.

If you are unable to locate the source of the frozen pipe, are uncomfortable attempting to thaw it on your own or cannot access the pipe safely, be sure to call a certified plumber right away to provide professional assistance.

Unfortunately, frozen pipes in the winter are a common occurrence. Luckily, it is preventable if you take the necessary steps to prepare your home for the cold winter season.

First and foremost, if you know that your pipes are prone to freezing due to their location in your home or their lack of insulation, the best solution is to be prepared. Whether you take on the job yourself, or call a professional, the key is to do it before cold weather strikes to prevent a burst pipe.

5 Tips to Prevent Frost on Windows

If you live in a cold climate, you have likely seen frost accumulate on the windows in your home. While the frost may look pretty and add to the winter ambiance, it is not good for your windows.

Older homes often feature single pane windows that don’t protect against the cold as well as modern windows. Seeing frost on your windows used to be fairly commonplace, but thanks to new window technology, our windows and homes are now better protected from the cold.

Here’s how you can protect your windows from getting damaged by frost.

Why Frost Forms on Windows

Frost forming on your home’s windows requires two atmospheric conditions; cold air on the outside and moist air on the inside. When these two conditions are present, the moist air on the inside of the home is drawn to the cold windows.

When the temperature outdoors gets below the dew point, the water vapor on the windows will begin to solidify into a liquid which then will freeze making ice crystals.

Single pane windows, most commonly used in older homes, are most susceptible to developing frost. More modern windows are armed with double or triple panes which help to prevent moisture from seeping in.

Why Frost on Windows is Bad

While it may provide a picturesque winter scene, frost is not good for your windows or your home. Frost can cause damage as it melts because it transfers moisture to whatever is next to it. In the case of your windows, it is usually a wooden surface.

If left untreated, you will begin to see paint and varnish peeling and damage to your wood. Eventually, mold will start to grow, and with it, a whole new host of problems and dangers for your home.

How to Avoid Frost on Windows

There are several things you can do around your home to avoid frost – and it’s effective even on older single-pane \windows

  • Make sure there are no plumbing leaks in your home. Even something as small as a slow leaking faucet can create excess moisture in your home.
  • Run a dehumidifier. This helps reduce the amount of moisture inside your home.
  • Make sure your home is heated properly. Keep the temperature in your home sufficiently warm at night time to reduce the possibility of frost forming.
  • Don’t hang clothing up to dry indoors. If possible, put clothing in the dryer instead of hang-drying during the winter since this will add moisture to the room.
  • Soak up any visible moisture on windows. If you see condensation on your windows dry it up with a towel before it can turn into frost.

If all else fails and you continue to have problems with frosty windows, your best bet is to invest in double-paned windows that will help to prevent frost and subsequent damage to your home.

Radon Testing: Tips Every Homeowner Should Know

Radon is a radioactive gas that causes cancer. Although you cannot see, smell or taste radon, it still may be lurking in your home causing major health concerns. For this reason, it is crucial that you do a home radon test to make sure that you and your family are not at risk from exposure.

Radon is the second leading cause of lung cancer in the United States, according to the EPA. Testing your home is the only way to know if you have dangerous levels of radon. It is recommended that all floors below the third be tested.

radon-gas

There are a couple of different options for radon testing; you can purchase a home radon test kit or you can hire a professional. If you are living in a home that you are not sure when it was last radon tested or you just want to have some piece of mind, a do it yourself radon testing kit will suffice just fine.

Professional radon tests are most commonly used when you are going to buy or sell a home and need accurate, documented radon levels in order to complete the transaction. Or, if you used a home radon test and would like to confirm the results with a professional, this is also an option.

The radon testing cost will vary depending on whether you choose to do a home test or hire a professional.

Do it Yourself Radon Testing

You can purchase a home radon test online or from your local home center or hardware store. You can expect that the radon testing cost will be between $10-$40 depending on the kit. Some states offer low-cost or even free radon testing kits, you can contact your state’s radon office to find out more.

Radon-Testing-Kit

Each kit will have included instructions, but in general this is the protocol you will follow to test your home for radon:

  • Testing should begin only after all doors and windows in your home have been closed for at least twelve hours.
  • You will then place the radon detector in the lowest livable area of your home and leave it alone for the next 48-96 hours.
  • After the recommended time is up, you will then immediately package and send the detector to the lab specified on your kit to be tested. Results will be delivered back to you.

Do-it-yourself radon testing is easy to do, affordable and highly accurate. This is a great choice for most homeowners to make sure that their home is not emitting dangerous, cancer causing gas that could harm their family.

Read More: Sources of CO Poisoning in the Home

Professional Radon Testing

Professional radon testing involves a nationally or state trained and certified radon specialist coming to your home and performing the test for you. Professional radon inspection is often included in a home inspection and will cost around $150 on top of the home inspection cost.

If done separately, you can expect to pay upwards of $250 for this professional service. The most important thing is that you know and understand your home’s radon levels to make sure that you are not being exposed to this potentially deadly gas.

Snow Shoveling: Tips & Tricks to Make the Job Easier

The days are getting shorter and the temperature is starting to drop, that means snow will soon be on its way. Shoveling snow is an unavoidable task that those of us living in snow-prone areas must contend with.

Snow shoveling is not only an inconvenience, it can also be hard on your your body — your back in particular. But with proper snow shoveling tips and techniques you can get the job done without putting too much strain on your body.

Choosing the Right Snow Shovel

An astonishing number of people are injured every year as the result of improper snow shoveling or overdoing it.

The number one contributing factor to snow shoveling injuries? Using a non-ergonomic shovel. Many shovels are poorly designed which leads to injury. Here are tips for finding the right shovel:

  • Keep the scoop size moderate. Instinctively, you may want to go for the shovel that has the largest bucket capacity. But it also means your body is lifting and tossing a heavier load which puts immense strain on your body. We recommend choosing a shovel with a bucket between 18-22 inches. snow-shovel
  • Choose a scoop material that works for you. Snow shovels are made from a few different materials. The main choices are: steel, plastic and aluminum. Each material comes with its advantages and disadvantages. For example, a steel shovel will be quite heavy in comparison to a plastic shovel but, will hold up better than plastic to driveway scraping.
  • The shaft material of the shovel is important as well. You want to choose a shaft that is study and doesn’t bend and twist when you use it. You may need to invest a bit more, but a fiberglass or resin handle is your best bet as they are lightweight and durable. snow-pusher
  • Pay attention to ergonomics. There is a big difference between an “ergonomically” designed snow shovel and a standard shovel. Many ergonomic shovels have a slightly curved shaft, while a traditional shovel will have a straight shaft.

    curved-snow-shovel
    The ergonomic shovel is designed to reduce strain on your back by reducing the amount of bending you have to do when scooping the snow. These shovels will cost you a bit more, but it is well worth the money to save the back strain that comes with traditional shovels.

Pushing vs. Lifting

It is always less stressful on the body to push the snow rather than lifting it.

You can purchase specialized snow shovels that are designed to push snow. These shovels have a large plow on the front. You can also push snow with your regular snow shovel.

If you are able, push the snow out of the way rather than bend, scoop, lift and toss the snow. You will greatly reduce strain on your body.

Be Safe

Besides choosing the correct shovel and using proper technique, there are many other things that you can do to make sure you stay safe and injury free while clearing your snow.

  • Make sure you are in good health. Heavy snow shoveling snow over an extended period of time becomes a cardiovascular activity. Check with your doctor to make sure that you in good physical shape to shovel snow. Elderly individuals and those with a heart condition are typically warned to stay away from shoveling as they are more prone to serious injury.
  • Dress for the weather. Make sure that your body is covered and warm, but be aware of overheating in those extra layers. Check the weather to see what the conditions are outside and dress appropriately. There may be a good window of opportunity for you to shovel snow without working in very rough conditions.

    winter-coat-walking


  • Take breaks. If you have to work during a heavy snowfall or when you have a large area to shovel, don’t try to do it all at once. Pace yourself and take a rest every so often, and stay hydrated.
  • Track the weather. During a large snow storm when snow is expected throughout the day, plan on going out to shovel several times. Don’t wait until the storm is over to try to clear the snow, this will only lead to heavier more compact snow that is more difficult to remove.
  • Always bend with your knees. To avoid putting excess strain on your back, bend at the knees to use those larger muscles to move the snow. Try not to bend at the waist and keep your back straight. A solid stance is also important — try to keep your legs hip-width apart and avoid twisting your torso.

Stay injury-free this winter and get the job done without taxing your body while you brave the cold and snow!

X

GET FREE QUOTE

What are you protecting?*

Step 1 of 4

Is your property currently monitored?*

Step 2 of 4

What size is your property?

Step 3 of 4

Who is this personalized quote for?*

By clicking this button, you consent for Alarm New England to use automated technology to contact you at the number provided. This consent is not required to make a purchase from us.

Step 4 of 4